Before we left on our six-year circumnavigation, we spent a year commissioning the boat and never once thought about the benefits of an exhaust temperature alarm. But the lack of an alarm was responsible for two of the most frustrating exotic location repairs we have experienced.
Here’s how to build your own exhaust temperature alarm.
Parts
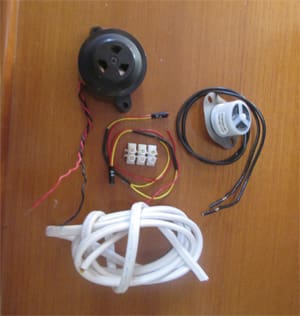
• One thermal switch of a design that allows it to be secured mechanically against the exhaust hose. We bought ours from Senasys (www.senasys.com — part number 2570F334). I bought one switch that is designed to close at 200° F, because that is what was used in the alarm I had purchased and it had worked when the temperature of the exhaust hose increased just a little. Just as important, it did not generate false alarms. The new switch is sealed for use in extreme environments.
Make sure the thermal switch you buy resets automatically. There are a few types of thermal switches that don’t, so read the specifications carefully. The auto reset versions tell you the temperature at which the switch will reopen. The switch we bought reopens when the temperature drops back to 185° F and is good for 10,000 cycles.
• One terminal block for making the required connections. We used the one in the photo because it allowed us to build the alarm without needing crimp-on terminals. We also like this type of terminal strip for small gauge wires because it does not require an additional cover given that there are no exposed contacts. The recessed screws make good test points if you ever have to troubleshoot the circuit. Once everything is assembled and tested give the connections a good coating of CRC spray-on corrosion inhibitor. The wires could also be soldered and covered with heat shrink tubing, if you prefer.
• One green 12-volt LED to indicate that the alarm is powered up when the engine power is turned on. I like the little ones made by Blue Sea Systems (model number 8172) because you can mount them by drilling an 11/64-inch hole and the LED will fit snugly. A dab of silicone rubber on the back of the panel (where the LEDs are mounted) is a good idea, especially if the panel you choose is very thin.
• One red 12-volt LED to indicate an alarm condition (same source as the green one, but model number 8171).
• A small alarm horn that can be found online or at Radio Shack. There are endless models to choose from on eBay. It would be good to find one that does not sound like any of your other alarms. If this alarm goes off, a quick response is essential. You don’t want to be trying to figure out which alarm is sounding.
 |
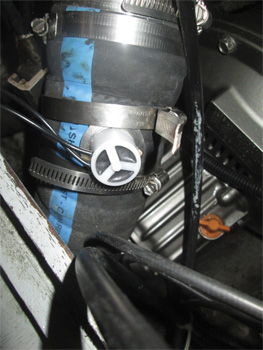
• A method for securing the sensor to the exhaust hose. We used two hose clamps long enough to go around the exhaust hose and hold the sensor firmly in place. Using big wire ties or a Velcro cinch would also work. Remember, your new alarm will sound before the hose gets too hot, so vibration is more of a concern than temperature tolerance.
• Sufficient marine-grade wire to reach between your exhaust hose and your chosen alarm location. You also need enough wire to reach your power source. If there is one thing that we have learned in six years of cruising it’s that cutting corners with untinned wire is not cheaper in the long run. Using good quality tinned stranded wire with marine-quality insulation is a good investment.
• You may want to make a small panel for mounting the LEDs where they will be noticed. We reused the little panel from our purchased alarm, mostly because we had already cut a hole for it. You could make a panel big enough to hold all the components of the system, except the remote-mounted temperature sensor, but that would require cutting a bigger hole somewhere to mount the panel.
• Depending on the type of thermal switch you use, you may need about three inches of heat-shrink tubing of large-enough diameter to fit around the back of the thermal switch. Use the type that is lined with glue that will seal the tubing around the wires when it is heated. That type of heat-shrink tubing will glue to the back of the thermal switch and also seal the hole where the wires enter at the other end. This will protect your sensor connections from any stray water that may find its way to the vicinity of the sensor.
You might want to use larger wire than is warranted by the amount of power involved so that the wires will be bulky enough to ensure a good seal where they exit the heat-shrink tubing. An extra glob of glue from a glue gun or a bit of silicon seal might be good insurance that the connections to the thermal switch stay watertight. Another option would be to encapsulate the back of the thermal switch in a big glob of silicone rubber or 3M Fast Cure 5200.
• Use a cover to protect the connections from accidental shorting if you use a terminal strip with exposed connections. Pieces of flexible clear plastic (like the material used in dodger windows) works well when held in place with a couple of small self-tapping screws with washers.
Tools
The tools needed for this project are minimal, but I’ll list what we used just because, on our boat, getting all the tools out takes almost as much time as the project. It’s always annoying when we have to make an additional descent into the locker where the less frequently used tools are stored to complete a simple project.
• Phillips head screwdriver and some self-tapping screws for mounting your chosen terminal strip, your LED panel and any wire restraint devices you choose to use.
• Diagonal cutters and a wire stripper.
• A soldering pen or gun with rosin core solder if you choose to solder the connections.
• A multimeter for testing the system.
• A heat gun for shrinking the heat-shrink tubing and testing the thermal switch (a BBQ lighter, or stove burner will do, but you have to be more careful with an open flame).
• An electric drill or drill bits for an electric screwdriver for mounting the panel, terminal strip, alarm horn and for any holes you need for routing the wires.
• A label maker to make labels for the LEDs. Sure, you know what they mean, but someone else may be on watch when the alarm goes off.
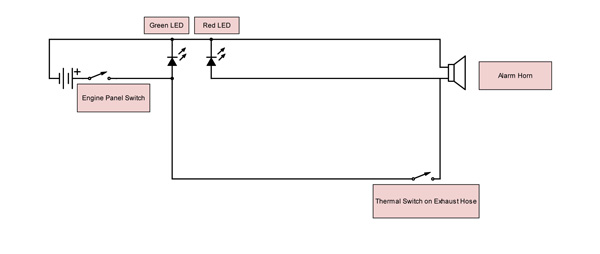
Connect the +12 volt terminal to a 12-volt source on the engine instrument panel so that it is powered up when the engine is started. We used the same source that provides +12 to our external alternator regulator.
Connect the -12 volt terminal to a negative buss bar.
There is no polarization issue with the thermal switch — it does not matter which way the wires are connected.
 |
|
The new temperature sensor installed on the exhaust hose and secured with hose clamps. There’s no need for heat-shrink tubing because this model of sensor is sealed. |
Testing the alarm
You can simply short the leads to the sensor to make sure the alarm goes off and the red light comes on when the circuit is closed. You could even add a test button to the alarm panel if you want to be able to test it every once in a while. The important thing to remember is that this only tests the circuit, not the ability of the sensor to do its job: detect temperature increases.
It’s a good idea to make sure your sensor is sensing temperature correctly. I recommend testing it before you go to all the trouble of wiring it into your alarm system. To test the sensor, you need a heat source. We used a heat gun since we already had it out for another project, but you could also hold the sensor near a lighted stove burner or a BBQ lighter. If you test the sensor with a pot of boiling water, you will have confidence that the switch will close. It does not take very much heat to trigger the sensor, so be careful. We hear the switch click in our sensor when the circuit closes, but connect it to a multimeter to make sure.
Installation considerations
Put the panel with the LEDs somewhere they will be noticed. Try to develop the habit of noticing that the green LED lights up when the engine is started. This tells you that the alarm is “armed” and ready to protect your exhaust system. Since ours is connected to the same power source as our alternator regulator, the pilot light on the alarm also tells us that the regulator is powered up.
Pay attention to the polarity on the LEDs. LEDs are diodes and only pass current in one direction. The leads on the Blue Sea Systems LEDs that we used are color-coded.
Install the alarm horn somewhere that it will be easy to hear by the person on watch. Make sure you can hear the alarm with the engine running.
Inform your crew of the importance of the alarm and to shut down the engine instantly if it goes off. An alarm test button would be a good idea if you frequently have to train new crew. It would let you demonstrate the sound indicating a problem. Labeling the panel with the name of the alarm is also a good idea.
———
John Lewis lives aboard his Tayana 37, Active Transport.

