One of the handiest little skills that I’ve picked up along the way has been splicing: three-strand, rope/chain and braided. Three-strand and the related rope-to-chain splice for anchor rode is quick and easy to learn, but my favorite has been splicing braided ropes.
They’re everywhere it seems: halyards, sheets, guys, docklines, lazy jacks, etc. And they wear. It’s common for the snap shackle to chafe the eye splice in a halyard or spinnaker sheet, and the main halyard will fray at the exit sheave when running downwind day after day.
It’s so much better to be able to just replace the eye splice in one of these lines rather than tie a bowline. The bowline reduces the overall hoist of a halyard and it can’t run freely through a pole end.
And let’s face it: splices just look nicer too.
Fids sized to match
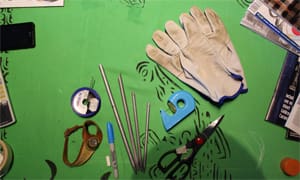
To splice 12-strand, you’ll need a few special tools. In particular, you’ll want a set of tubular fids and a pusher. Unlike fids for three-strand, braided rope fids are sized to match the rope. The diameter of the fid allows it to be pushed through the braided cover or core, and the length of the fid is used to measure and mark the rope while making the splice. I’ve tried both the Samson and the New England Ropes fids and personally prefer the Samson ones.
I use Scotch tape for holding the strands together during splicing — it’s plenty sticky, and thin enough that you can leave it inside the splice if need be. Normally I’ll use a Sharpie permanent marker to mark lengths and strands, although recently when working with glossy black dock lines, I found that white chalk was best (thank you Raine) for the black covers, leaving no permanent marks on the line.
 |
|
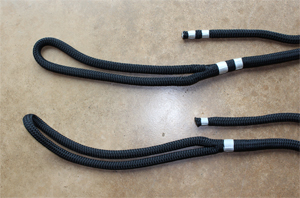
Two splices, one with double whipping, one single. |
|
Jeff Williams |
A pair of stainless steel scissors is great for cutting lines. I use shears intended for garden work. And I wear light leather gloves — also from the hardware store — for finishing the splice.
For instructions, download either the Samson Ropes or New England Ropes splicing guide. Don’t be overwhelmed by the plethora of different splices; just start with something basic, like an eye splice in Dacron double braid. Note that there are different splicing techniques for different rope technologies. Be sure to choose the technique that matches your rope.
For your first splice, start with a piece of new line. Older ropes can be spliced, yes, but they are a lot harder to work. New line is slippery and clean, and has not been tensioned. If you are working with used line, you’ll need a solid anchor point to work against, and it helps if the line has been soaked in fresh water for a while as well.
Take your time and don’t be afraid to disassemble the whole thing and start over if need be. I recall one time I was splicing lines onto a new set of fenders. Nearly finished with the first eye splice, I proudly held it out to admire… and noticed I forgot the fender.
Whip it good
Splices should be finished with whipping, as mentioned in the instructions. You can use the whipping for other purposes, too. On the dock lines I just spliced, I used a single whipped band at each end of the line to indicate a short dock line and double bands to mark longer dock lines. Now you can pick an end easily from pile and know what’s in your hand.
With a little patience and practice, you can make all of your lines look professionally finished and easy to work with.
Contributing editor Jeff Williams and his wife Raine completed a six-year circumnavigation on their J40 Gryphon. For more on their trip, visit their web page www.j40.org.

