Editor’s note: We’re revisiting this series on navigating by the sun, moon, planets and stars in the age of GPS because celestial nav is not only a viable backup to satellite navigation, but it is also a skill that ocean voyagers should have in their toolkit. In this series, we’ll cover all the basic knowledge you’ll require to get up to speed on this elegant and rewarding technique for finding your way at sea. Click to read Part 1, Part 2, Part 3, Part 4, Part 5, Part 6, Part 7, Part 8, Part 9, Part 10 and Part 11.
In this installment, we’ll discover moon sights and how they add a useful celestial body to your arsenal. We will also look at how to use celestial navigation techniques to determine your vessel’s compass deviation.
The two big celestial bodies for shooting sights are the sun and the moon. We’ve discussed the sun in detail and now it’s time to look at the other body, which has a few more wrinkles than the sun that we have to take into account.
The moon has the obvious advantage that it is big and bright enough to be seen during the day. Better yet, it is easy to identify. However, it has a reputation among celestial navigators as being a difficult sight to reduce to a usable line of position (LOP). And that reputation appears to be borne out by a quick look at the data for the moon on the daily pages of the Nautical Almanac. Instead of the two columns of data like the sun, the moon has five columns of data. In addition, there is a separate altitude correction (converting Ha to Ho) table for the moon in the back of the Nautical Almanac. These differences may seem daunting, but this added data is handled similarly to the way we use the data for the other celestial bodies, so we’re building on what we’ve already learned.
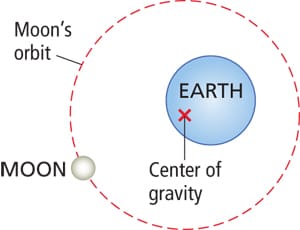
All those extra columns for the moon are based on two physical facts: 1) the Earth and the moon are a system, and 2) the moon is close to us, astronomically speaking, and so every little bounce and wiggle is noticeable.
While we may think the moon orbits around the center of the Earth, in fact, the moon’s mass is enough to move the center of gravity of the Earth/moon system away from the center of the Earth and closer to the Earth’s surface. The center of gravity for the system is called the barycenter. The result is that the Earth wobbles as the moon goes around. This increases the complexity of the moon’s motion as seen from Earth. And because the moon is roughly 238,900 miles away compared to the 93 million miles of the sun, this added complexity has a greater influence on the moon’s observed position.
These two factors are the reason for the added corrections — apparent altitude (Ha) to observed altitude (Ho) — to the sight correction process, and they increase the importance of the d and v corrections.
In addition to being easily seen and identified, the moon also has the advantage of sometimes being visible during the day. When that’s the case, it provides an excellent opportunity for a fix by allowing the navigator to cross its LOP with that of the sun and get a fix position.
 |
|
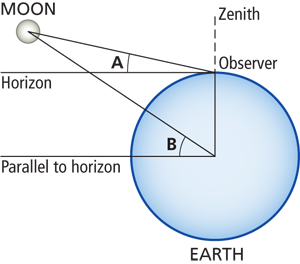
In celestial navigation, we are theoretically measuring the angle between the horizon and the moon at the center of the Earth. However, since we are on the surface, a certain amount of parallax error is included in our sextant sight — more for the moon since it is so close. The horizontal parallax (HP) factor helps us correct for this. |
There are five columns of information for the moon on the daily pages. GHA and declination are familiar to us by now. There is also a separate column for d and v factors for each hour. In addition, there is a column for HP, which is an abbreviation for horizontal parallax. This HP number is used in correcting our moon sight to Ho. The v factor is always positive for the moon, while d gets its sign based on the trend in declination, just as it does for the sun. Make sure you don’t make the mistake of using the increase or decrease of d to determine its sign. There is a special column for GHA increments for the moon in the colored pages; otherwise, this is just like a sun sight.
Correcting a moon sight is somewhat involved but really only adds one step, or sometimes two. Turn to the sight correction pages in the back of the Nautical Almanac. Index error and dip are exactly the same as for any other sight. There is a dip (height of eye) table back with the moon sight correction tables; it is the same dip table as that for the sun and stars. The table is repeated here just for convenience.
Use the Ha (apparent altitude) to enter the top of the table. Find the correct column for your Ha. Now, descend to the correct degrees and then the proper tens of minutes. The degrees are listed in bold in the column. The row for the tens of minutes is listed to the far left and right of each page. That value will be added to Ha.
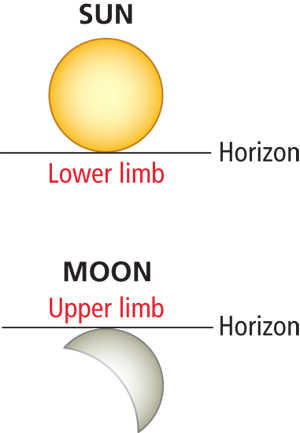
Continue down the column to the line labeled with “L U”. Pick “L” if you shot the moon’s lower limb and “U” if you shot the upper limb. Follow down the appropriate column until it crosses the row for your HP. This is also added to Ha. If it was an upper limb shot, 30 minutes must be subtracted from the result to get Ho. The directions for the table are right there on the page.
Sample problem
On Nov. 27, you took an upper limb sight of the moon. The time was 19:26:46 GMT and the Ha (corrected for index error and dip) was 42° 41’. Find GHA, declination and Ho.
First, head to the daily pages and get the five pieces of information you need: GHA for 1900 is 178° 35.2’; v is 12.8; declination is 1° 21.8’ N; d is +11.8; and HP is 58.5.
Now, back to the increments page for 26 minutes. The increment for 26:46 is 6° 23.2’; the v correction is 5.7’; and the d correction is +5.2’:
| GHA 1900 increment 26:46 v correction GHA 19:26:46 declination 1900 d correction declination 19:26:46 |
178° 35.2’ + 6° 23.2’ + 4.9’ 185° 03.3’ N 1° 21.8’ + 5.2’ N 1° 27.0’ |
Now it’s time to correct from Ha to Ho. Enter the table in the column for 40°-44° with the Ha of 42° 41’. Move down the column to the bold 42 and then five more rows to the row for 40’. The correction here is 52.0’.
Continue down to the “L U” and pick the U for upper limb sight. Move down that column to where it crosses the row for HP = 58.5. That correction is 4.0. Both these corrections are added to Ha. Because this was an upper limb sight, 30’ must be subtracted from Ha as well.
| Ha 1st correction HP correction upper limb correction Ho |
42° 41.0’ + 52.0’ + 4.0’ – 30.0’ 43° 07.0’ |
 |
|
Sometimes, due to the changing phases of the moon, we need to shoot an upper limb sight because the lower limb is not visible. |
Determining compass deviation
Even when you’re far out at sea, well out of sight of any landmarks, it is relatively straightforward to determine the deviation of a compass.
Probably the most difficult part of the process is to take an accurate bearing to the sun. With a dome compass, stand on the opposite side of the compass from the sun and look straight down onto the lubber line in the middle of the compass card. The reflection of the sun will appear as a small dot of light next to the edge of the compass card. The bearing on the compass card closest to the dot of light is the compass bearing to the sun. Note the time when the bearing was taken.
One advantage to ocean sailing is that on many passages the vessel’s heading does not change significantly. Therefore, it is not necessary to determine the compass deviation on a variety of headings. Use the time — and date — to determine the declination and GHA of the sun. Combine the GHA with an assumed longitude to find LHA. Enter the sight reduction table with an assumed latitude, declination and LHA.
From the sight reduction table, get the Z and then convert that to Zn using the formula that appears on the upper left-hand corner of each page. Zn is the true bearing to the sun.
This needs to be changed to the magnetic heading (assuming the compass in question is a magnetic compass). To do this, the magnetic variation needs to be applied. Magnetic variation can be found on pilot charts.
Finally, the difference between the magnetic bearing and the compass bearing is the deviation. If the magnetic bearing is larger, the deviation is east. If the magnetic bearing is smaller, the deviation is west.
Here’s an example: A vessel is on a heading of 100° according to its compass. In the late afternoon on July 27, a bearing is taken to the sun of 276°. The time is 20:02:20 GMT. The DR position is 39° 04’ N, 61° 52’ W.
Looking on the daily page for July 27 for the time 2000:
| GHA 02:20 GHA assumed longitude LHA |
118° 22.9’ + 35.0’ 118° 57.9’ – 61° 57.9’ 57.0° |
|
| d = –0.6 Declination = N 19° 07.4’ No d correction Assumed latitude = 39° N |
||
Take the assumed latitude of 39° N, declination of 19° 07.4’ N, and LHA of 57° into the sight reduction table. Z = 95°:
| Z Zn (true bearing to sun) |
360° – 95° 265° |
From the pilot chart, the magnetic variation in this area of the North Atlantic is 19° W; this is added to true direction to get magnetic direction.
| True Variation Magnetic |
265° + W 19° 284° |
Now, compare the actual magnetic bearing to the compass bearing.
| Magnetic Compass Deviation |
284° – 276° 008° |
Because the magnetic bearing is greater than the compass bearing, the deviation is east. So, on a heading of 100°, this vessel has a compass deviation of 8° E.