Long distance voyagers should carry a spare seawater pump for their engine. A set of spare parts for the pump will be of little use unless you also have gear pullers, a press, and internal and external snap-ring pliers. And, who wants to try to rebuild a pump at sea?
One of the first spare parts that we purchased for our new Yanmar engine was a new seawater pump. The Yanmar dealer truthfully advised that a set of spare parts for the pump was much less expensive. However, I already had experience in rebuilding similar pumps while serving in the Air National Guard as a diesel generator mechanic, so I knew that the job wasn’t trivial.
Our new pump was called in to action nearly nine years later, when the original pump seal started to leak seawater. Changing the pump was easily accomplished; rebuilding it was not.
 |
 |
|
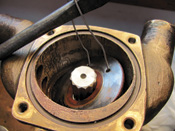
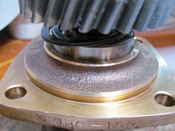
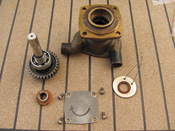
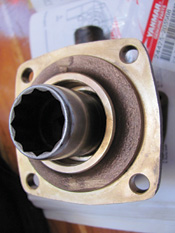
Top, fishing out the wear plate. Below, internal snap ring removed and bearing partly extracted. |
While the following narrative is specific to the pump on our Yanmar model 4JH2E engine, most seawater pumps are of similar design.
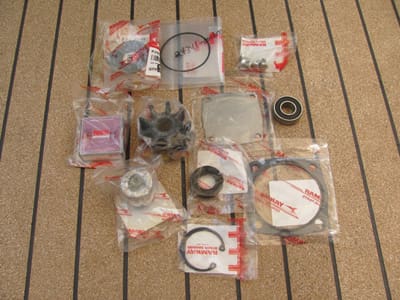
We purchased a complete set of parts for our pump from the local Yanmar dealer. Included were a new impeller, cover plate, wear plate, bearings, water and oil seals, snap rings, gaskets, and O-rings.
Disassembly
First, I removed the end plate and O-ring. A Jabsco model 50070-0200 impeller puller easily removed the old impeller. The wear plate refused to budge, however. I finally removed it by threading a length of stainless steel seizing wire through the two holes in the wear plate, using a long screw driver as a handle, I was able to yank the wear plate free.
The external snap ring was then removed from the shaft using special snap ring pliers.
To remove the water seal, the large internal snap ring behind the drive gear was removed. This allowed the drive gear, shaft and bearing to be pressed out.
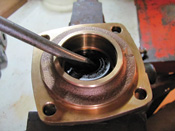
A large screw driver was used to pry out the oil seal. Be very careful to avoid deforming the metal seat under the oil seal.
To remove the water seal, use a suitably-sized (1.25-inch) socket wrench as a driver, and gently press out the water seal using a large vise or C-clamp.
 |
 |
 |
|
Top, carefully prying out the oil seal. Center, the seawater pump dismantled. Bottom, pressing in the new oil seal using a large socke |
Cleaning and inspection
Thoroughly clean the exterior and interior of the pump, and the shaft, gear and bearings. Clean diesel fuel is a very good cleaning solution. Inspect the bearings by turning them slowly with your fingers, listening and feeling for rough spots or grinding noise. NEVER spin a ball bearing with compressed air! While it is tempting to do so — it makes a pleasing sound — it is truly a death knell for the bearing. It is not likely that the bearings and drive gear are worn, but if they are, a special gear puller and press will be required to remove and to replace them. I replaced the outer bearing on my pump, but had to enlist the aid of the local machine shop to do so. Lubricate the bearings and shaft with clean engine oil and store them in a clean plastic bag.
Assembly
Place the shaft, bearings and stationary part of the water seal in the freezer to shrink them a bit. This will make reassembly much easier. Coat the oil seal with silicone grease and place it in the pump with the flat side down. Using the large vise and socket wrench, gently press the new oil seal into place. Change to a smaller socket wrench (just a bit smaller than the outside diameter of oil seal) and continue to press, ensuring that the seal is fully bottomed out in the pump cavity.
Remove the water seal from the freezer, coat the pump cavity with silicone grease and press the water seal into place using a 1.25-inch socket wrench. The large vise or C-clamp will be required to apply the required force. Protect the ends of the pump housing with thin pieces of wood or lead.
Coat the lips of the oil seal with grease. Remove the shaft and bearings from the freezer. Install the shaft by gently pressing the bearing into the pump body. Apply force only to the outer race of the bearing, and do not hammer on the shaft. The cold temperature will slightly shrink the bearing, allowing it to slip into the pump body with minimum force.
Reinstall the large internal snap ring behind the drive gear.
Turn the pump over and place the water seal O-ring on the shaft up to the shoulder, followed by the rotating part of the water seal which you have lubricated with silicone grease.
Install the external snap ring on the water seal and then install the wear plate.
If the water pump is to be immediately returned to service, lubricate the impeller and cavity with glycerin. Do not use petroleum-based grease unless specified by the impeller manufacturer. (No glycerin? Use a personal lubricant such as KY!)
Use a hose clamp to compress the impeller vanes, carefully arranging them in the trailing position, and slide the impeller into position. Install the rubber disk in the impeller shaft hole.
Install the new cover O-ring and then the cover plate. The cover plate can be reversed if it is worn significantly. I draw an arrow on the cover plate showing the direction of rotation. It’s a lot quicker than looking it up in the service manual.
If you do not plan to place the pump into immediate service, do not install the impeller. Keep the impeller for the next replacement interval. If you make a practice of replacing your impeller every two years, then you will never experience the excitement resulting from a worn impeller and resulting engine failure!
Contributing editor Harry Hungate and his wife, Jane Lothrop, spent the last two years cruising in the Mediterranean Sea as part of a circumnavigation. They recently crossed the Atlantic from the Canary Islands to the Caribbean aboard their Corbin 39 cutter, Cormorant.