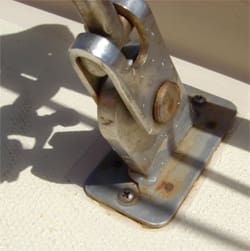
If your vessel has chainplates (and what sailboat doesn’t?) then you probably also have chainplate leaks. The constant flexing of the hull and rigging will eventually break down even the best sealants, allowing seawater and rain to creep along the chainplates, creating corrosion on the chainplates and the bolts, saturating cored decks, staining and rotting the cabinetry and worse. A chainplate failure can propagate to rig failure and dismasting. Because of this, fixing chainplate leaks is a high priority.
Have a good look at your chainplates after a bout of heavy weather sailing or heavy rain. Look carefully for signs of dampness or rust or discoloration on the surrounding cabinetry. Use an inspection mirror if needed to get a look at concealed chainplates, or wipe them with a soft cloth to collect any traces of rust. Remove and inspect a bolt or two even if everything appears fine. During a major refit in New Zealand, we pulled every one of our 11 chainplates and condemned three chainplates and eight bolts due to corrosion. With a competent machine shop nearby, we got new chainplates fabricated to replace the corroded ones.
 |
|
The newly fabricated chainplate is installed and sealed. |
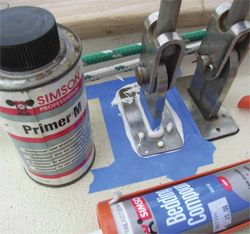
Priming the key
Over the years we have tried many products ranging from RTV silicone rubber, to BoatLife, Sikaflex, and GE SilPruf, with varying degrees of success. We have also had excellent results using Simson ISR 70-02 sealant and Simson Primer M Professional. The sealants are available in standard caulking gun cartridges in black and white. The primer is quite expensive, but do not expect success without it. The proper primer is essential to a long-lived seal, especially when bonding to stainless steel. (We have since learned that all of the polyurethane sealants work best when used with their respective primers.)
Begin by slackening the rigging turnbuckle and removing the shroud line to a safe place. Tie it to a stanchion to keep it from beating in the wind. Remove the chainplate deck trim plate and chainplate fastenings. Cut out as much sealant as possible using a utility knife. Using a rotary grinding tool, such as a Dremel tool, clean out the old sealant from around the chainplate, taking great care not to damage the chainplate itself. Grind out a bit of the surrounding fiberglass to leave a clearance space of about a quarter-inch around the chainplate so that there will be a “cushion” of sealant around the chainplate where it goes through the deck. A vacuum cleaner is a big help in keeping the work area clean. If water has gotten into the deck core material, now is the time to make that essential repair. You will want to undercut the core material and fill in the area surrounding the chainplate opening with a mixture of epoxy resin and microballoons or hull and deck putty to create a water-tight barrier.
A halyard for purchase
If the chainplate shows rust inside the boat, then it should be removed for inspection. To remove a stuck chainplate, try pulling on it with a halyard. Be sure to tie a “preventer” to the halyard and chainplate to keep from launching the chainplate when it breaks free!
Clean and inspect the chainplate and fastenings, and do not hesitate to replace them if cracking or corrosion is present. Ideally, the chainplates should be polished to remove any scratches. Scratches are a source of stress cracking and corrosion.
Install the chainplate, making sure to use lockwashers or self-locking nuts on the chainplate bolts. If self-locking nuts (“nylocs”) are used, do not reuse the old ones, as they cannot be relied upon. Always use new self-locking nuts. If new nylocs are not available, then put a couple of drops of blue Loctite thread locker on the bolts. Give the chainplate and opening in the deck a good scrubbing with acetone or MEK, then treat the chainplate and surrounding areas to be sealed with the appropriate primer, carefully following the instructions on the container. Again, primer is the key to a successful and long-lived seal. Use masking tape to define the areas to be sealed as this will greatly assist in cleanup.
When installing the deck trim plate over the chainplate, forget about the screws holding it down to the deck. Treat the underside of the trim plate with sealant primer and install the trim plate before the sealant cures. The sealant will hold the trim plate in place. The screws are not really necessary and are sources of leaks. Allow the sealant to cure overnight before removing the masking tape. Reconnect and tension the shroud line, using a new cotter pin in the clevis. After a sail or rain, inspect the chainplate to satisfy yourself that your seal job is perfect.
————–
Harry Hungate and his wife, Jane Lothrop, have cruised in their Corbin 39 cutter, Cormorant, more than 52,000 miles since 1997. They completed a west-about world circumnavigation in December 2011. Follow their adventures on http://harryjane.weebly.com/blog.html.

