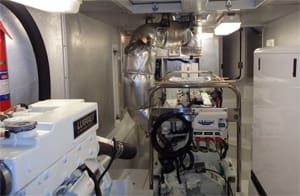
Editor’s note: In part one of a two-part piece, Jeff Merrill examines the importance of making regular engine room checks and how to set a system to catch the most important information.
A few months back I was doing an engine room check while training clients. When I came out and took off my earmuffs, I noticed I had missed a text from my wife Pam. I needed to go up to the pilothouse to check on our progress so I sent her a quick reply, “Been in the ER, can’t talk right now.” Pam knew I was offshore with clients, but my text alarmed her so she called and when I picked up she asked if I was okay and what happened. “I’m fine, just did an engine room check and we are running along smoothly.” Well, that was the time when I learned that ER to her meant emergency room and I’m much more careful in my texts now.
 |
|
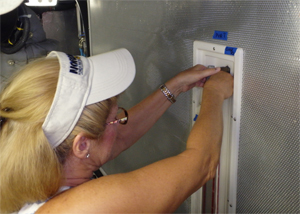
Marking sight glass valves. |
Regular engine room checks (now that you know, we can call it the ER) are necessary to ensure your machinery is operating properly. I like to add that ER is actually appropriate in both definitions because if you don’t check your engine room, it could turn into an emergency room. For many trawler owners the idea of going into the engine room is daunting. We rarely look under the hoods of our cars anymore and most sailboats have an engine “locker” not a room — typically a tight space you can barely inspect from afar with a flashlight. Most modern trawlers actually have a true move-around area with hot moving machinery fitted with working parts, hoses, wires, gauges and all kinds of important-looking systems and tanks. Knowing what to do and what to look for is not something that comes naturally. Most of my clients are more than game to learn what to do but have only a limited idea of what to expect, what to inspect and how to go about a proper engine room check.
The best place to get acquainted with your engine room is at the dock — machinery off, with just the lights and bilge pumps on. When your engine(s) are running it’s too hot and too loud so it’s much easier to do an orientation when nothing is running, allowing you to easily converse. We can take our time and methodically review all of the details in a comfortable environment, which greatly accelerates the learning curve.
 |
 |
 |
 |
|
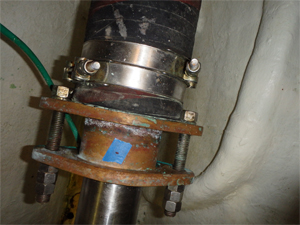
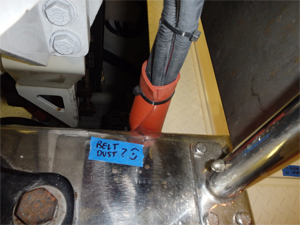
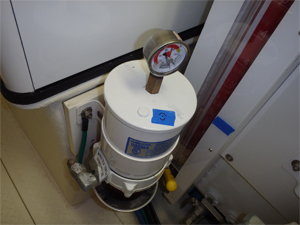
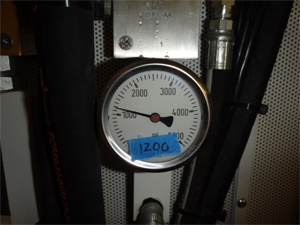
Examples of labels in the engine room: 1) a temperature mark on a stuffing box coupler, 2) visual mark for checking belt chafe; 3) visual check for the Racor fuel filter, 4) a hydraulic pressure gauge reference note. |
During this introduction I like to review the fuel tanks, supply and return valves, Racor fuel filters and ensure that you understand the fuel flow path. Not every owner knows that diesel engines don’t burn all of the fuel on the first pass through and it’s important to understand your return manifold. Next I like to review the pre-start checks: oil dipsticks (mains and transmissions), coolant tank level, belt tension, intake through-hulls open and strainers clean. One important tip I impart is that it is always a good idea to have a paper towel in your back pocket and within easy reach; your fingers can interact with some messy fluids, and many trawler owners keep a roll of paper towels ready in the ER.
With this basic orientation completed, we can then begin to identify and mark our “targets” so we can then create our engine room inspection checklist spreadsheet. I start with a roll of blue tape and a Sharpie (permanent ink) pen and begin describing parts and hand-writing labels. It seems to work better to just start at the ER entrance and work our way aft, identifying every individual part we see so that components can be labeled (you can come back later with a nice label maker and replace the blue tape notes) and each function can be discussed. By the time we’ve worked our way to the aft bulkhead, the ER has broken out in “Merrill Pox” with dozens of blue tape tags scattered about.
In addition to identifying and labeling components — fuel pumps, oil filters, coolant tanks, pressure gauges, etc. — I also start typing up a detailed Excel spreadsheet that will catalog various items to record temperatures and/or values. This “Engine Room Temperature Watch and Inspection” sheet is a work in progress and takes several different ER checks to fine tune. What I want to develop is a logical workflow for my owners to systematically move about the engine room while underway and write down a summary of what is going on. The first draft is typed up, printed out and then clamped onto a clipboard. I use two types of blue tape marks that I refer to as targets: one a thick dot • for use with an infrared temperature gun like when shooting the coolant tank temp, and the other an eyeball image (•) for visual checks like the Racor filter vacuum gauge. As you position temperature targets you need to consider how you will hold the infrared gun so you can do it safely. For accurate temperature readings, the laser light needs to hit the same dot and there should be no more than a 4- to 6-inch gap between the target and the end of the gun. Don’t place a target in a location that risks you bumping your hand on hot machinery or getting caught on rotating parts.
With the blue tape marks in place and the first draft of your spreadsheet on the clipboard, it’s time to start up the engines and get underway to conduct the first inspection. We all know surgeons work in a sterilized operating theatre and wear masks, a gown and gloves. It’s not exactly the same in our ER, but a good clean engine room makes it easier to notice if you have a new leak or to spot chafing dust from a tired belt. We even have our own wardrobe: earmuffs are essential, safety glasses are ideal and don’t wear loose-fitting clothing or jewelry that could catch on running machinery. Our onboard surgical instruments are not scalpel and knife, simply infrared temperature gun and flashlight. I’ve heard some engine rooms described as “so clean you can eat off the top of the engine”; personally I’d recommend saving the dining for the galley and saloon, but the idea of maintaining things in spotless condition will make it easier to notice more leaks, drips and other problems sooner and is an excellent standard to strive for.
Jeff Merrill, CPYB, is the president of Jeff Merrill Yacht Sales, Inc.- www.JMYS.com. He’s a veteran yacht broker who provides individual attention and worldwide representation to buyers and sellers of premium brand, oceangoing trawlers. Merrill is active in the cruising community as a public speaker and writer and enjoys spending time at sea with clients. Jeff has written several “Dialing-In” your trawler articles for Ocean Navigator’s Power Voyaging column and is constantly looking for new ideas to improve and simplify the trawler lifestyle. If you have a suggestion or want to get in touch please e-mail Merrill at: Jeff.Merrill@JMYS.com.

