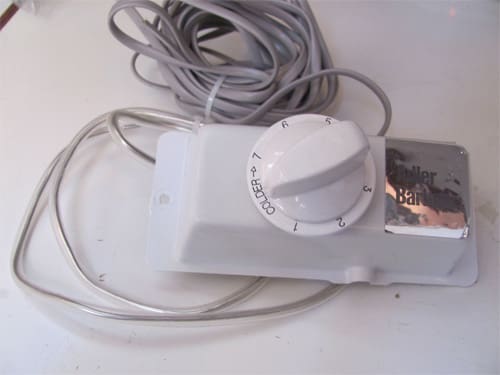
The mechanical thermostats (temperature sensing switches) supplied with most boat refrigerators work fine for two years or so. Murphy’s Law says that they will fail when your refrigerator/freezer is full of perishables and you are days away from a place to buy a replacement. After replacing our mechanical thermostats at roughly two-year intervals, I finally wised up and inquired about an electronic replacement.
 |
|
2) A resistor embedded in mechanical thermostat wire. |
 |
|
3) Connecting the wiring on an electronic thermostat. |
 |
|
4) Solid state temperature sensor (black wire) in free air space. |
 |
|
5) A Carel brand thermostat fully installed. |
Carel, an Italian company, manufactures a very nice electronic thermostat. This device can be ordered from www.rparts.com. Order part No. 015-0001 thermostat for U.S. $189.50 and temperature sensor part No. 015-0002 for U.S. $18.95. The installation and operating instructions can be downloaded from this website if you would like to have a detailed look before ordering.
Making the connections
Installation is straightforward. Remove the old mechanical thermostat, and unplug the two wires from the old thermostat to the compressor/condenser unit. Inside of the old mechanical thermostat you will find a small resistor in one of the wires. This resistor determines the speed of operation of the compressor.
Remove the resistor from the old thermostat and connect it and the two wires to the new electronic thermostat terminals 1 and 2. Mount the electronic thermostat outside of the cooled space where the temperature display can be easily seen. A small bracket made of aluminum or plastic will make a neat job of it. R-Parts even sells a kit that includes the mounting bracket, fuse holder, etc.
The temperature sensor should be mounted in free air space near the evaporator, but not touching the evaporator wall as was the old sensing tubing. Route the sensing wire where it will not be easily damaged. Keep it clear of main power wiring, as it is very sensitive to interference. Connect the sensor wires to thermostat terminals 7 and 8.
This electronic thermostat can operate on 12 to 24 volts AC or DC. Be sure to install an in-line fuse of 150 milliamps in the positive lead. Note that as the thermostat will operate on AC or DC, the device is not polarity-sensitive. I connected the 12-volt DC positive lead to terminal 4 and the negative lead to terminal 5.
The thermostat is quite susceptible to radio frequency interference, however. If you notice that your refrigerator compressor turns on each time that you transmit on your SSB radio, then simply add a snap-on ferrite (available from Radio Shack) around the wire from the thermostat to the compressor and around the temperature sensor wire. Try one ferrite around both wires at first, but under no circumstances include the power wires in the ferrite.
Read the directions carefully before powering up the thermostat. They will seem quite daunting at first read, as the thermostat is actually a sophisticated proportional plus integral controller with many features that are not needed for simple on/off temperature control. The thermostat can be configured to display degrees Fahrenheit or Celsius. We chose degrees Celsius because at a quick glance 0.0 means freezing. To ease your task, R-Parts has a configuration guide at www.rparts.com/documents/Simple_015-0001_Programming.pdf. Or, simply use the settings in the accompanying sidebar, which we have used with the Carel Model IR32V0E thermostat. Note that some of the settings are default values, so just skip over them.
Our first electronic thermostat performed flawlessly without the slightest bit of attention since we installed it in November 2004. It somehow received a few drops of salt water during our Atlantic crossing, and failed shortly after arriving in Puerto Rico. We located this suitable replacement from R-Parts. The temperature display is most reassuring, and can be read from across the boat.
Here’s a tip that will likely increase the life of your evaporator plate: don’t shut down your refrigerator when leaving the boat. The very thin walled aluminum evaporator is subject to corrosion when at room temperature. It’s about the thickness of a soft drink can, and very difficult to repair once corrosion sets in. So, keep it cold: the low temperature will slow the rate of corrosion and extend the life of the evaporator. We usually get about six years of full-time use. (Thanks to Pat at R-Parts for reviewing and commenting on this article.)
————–
Harry Hungate and Jane Lothrop have lived aboard their Corbin 39 cutter Cormorant since 1997 and recently completed a west-about circumnavigation. They will spend the next couple of years cruising the U.S. East Coast. Follow their adventures at http://harryjane.weebly.com/blog.html.

